Google has a “forms” tool that lets you customise what specific information you need to be emailed to you, which you can use as an event booking/registration form that lets attendees easily fill out all the information you need, in a convenient way for you both!
Your attendees simply type in their information and click send. You get the responses in a spreadsheet.
This can be filled out by anyone who has the link – they do not need a google account, but you will need to have one (They are free, so you can make one if you don’t already have one).
If you do not have a google account and you’re a chapter, then you could designate someone to be your event coordinator who manages a chapter email account (yourchaptername@gmail.com) and use that for Chapter matters.
How to make a Google Form.
 In any other Google product page when you’re signed into your Google account, click on the square of dots to open the menu of Google products.
Scroll right down to the bottom where you’ll find the “forms” option.
Then once you’re in the Forms screen, click on the first option with the + symbol titled “Blank Form” to start a new form.
This image below shows what all the sections are for, and it looks very overwhelming, but don’t worry – the options are explained below.

(Click the image for a larger view)
- “Untitled Form” – Change this to your Event Title.
- “Form description” – You can add your event information in here.
- “Untitled Question” – Change the title to what you need, and you can change the type of response using the little arrow. By default this is a multiple choice, I would suggest changing it so that the first few questions you ask are the name/phone/email questions.
- Use “Short Answer” for a spot the attendee can enter in things like their name, phone, email.
- The default question is a “Multiple choice” select – this means they can click to select ONE option in a list you provide.
- “Checkboxes” is a similar option to multiple choice, but it will allow the attendee to select more than one – useful for listing food intolerances or activities that they can select to book.
- More Questions – To add more questions to your form, click the + icon on the toolbar on the right.
- Change order – If you need to change the order of the questions, you can drag the question boxes using the 6 dots on the top of the box.
- Add an image – To the top of the form, you can select the icon of the paint pallet, then go down to “header” and select a photo of your own, or choose one from the available options.
- “Settings” – You don’t need to change anything here – leave everything as it is by default. There are some settings you definitely need to keep OFF (as they are by default) because having them off will allow people to fill out the form without needing to sign in to Google (so it will work even if they don’t have a Google account).
- Collect email addresses (set to ‘do not collect’)
- “Requires Sign in” (leave off/grey)
- Allow response editing (leave off/grey)
- Limit to 1 response (leave off/grey)
- Disable auto-save for all respondents (leave off/grey)
- Preview – Check how your form looks and if the options you’ve chosen work as you need them to.
- “Publish” – Once you are done. You can edit the form afterwards if you’ve forgotten something. You’ll be asked for the sharing options (you can change this later with the little triangle)
- Make sure that “Editor View” is restricted
- Make sure that “Responder View” is “anyone with a link“
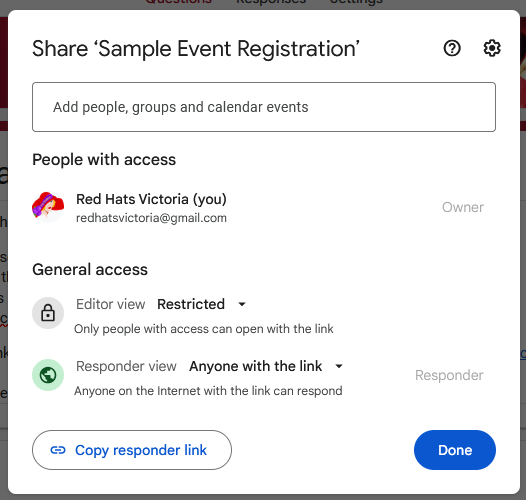
“Copy Responder Link” will get you a shareable link, but a better way to get the link is to click the link icon on the top menu – where you can select an option that will shorten the link to get rid of a lot of the random numbers/letters.

Copy the link and you can then use it in your event flyer – or use the Google Form itself as your event notice (if you’ve put all the info on the event in the description part.)
To view the responses, click on the “responses” tab and click the option to “Link to sheets” – after it has made the spreadsheet, this button will then change to “view in sheets” and is how you can view all the responses.

This is what the responses will look like (The columns you have will depend on what questions you asked).

The last step you want to do is to set the form to email you whenever someone submits a response. To do that, click on the “responses” tab, then click the 3 dots and click the option to receive responses (it will show a tick when activated)


